Tuesday
Jun022009

News Videographer: Shoot in HD where possible

A couple of months ago I wrote a piece about why it is important to shoot in high definition even if you plan to down convert to SD when you edit. Here was the original post.

My points mainly concerned the positive quality benefits of shooting in HD of HDV even when producing a standard definition project.

However, Angela Grant over at the excellent News Videographer blog - one of my favorites - has revealed that she too always shoots in HD using a Sony HVR-Z1U. She gives a couple of strong reasons for doing so. Among her points are:

"For me, I always wanted to shoot in HD because it gave me the choice of pulling framegrabs for publication in the newspaper. Also, it’s nice to have the choice to process your video as either HD or SD. Plus, this is the format of the future. Why buy outdated technology? You may as well join the bandwagon now, and not later."

Angela often does as I do and captures her HD footage in SD. But she suggests capturing in HD and converting during export if you have time.

Friday
May292009

Video provides material for the radio star!

As many of you will be aware, being a one-man-band reporter, shooter, producer, editor, graphics designer and so on, is no easy task.

Well, for some of us, it doesn't end there. In the current economy, many multi-skillers are attempting to produce material for more and more clients. Rather than produce different pieces for different clients, one pretty good model is to resell material to multiple clients (if it is contractually legitimate to do so), and that often means not just television networks... it means multiple media types, and multiple platforms.

More or less every story I do for a TV outlet is turned into a radio story for various stations and networks, and a text story for broadcasters' websites. I have been doing this for many years. In fact, radio is my background.

It's important to distinguish between a media and a platform. When I talk about multi-platform, I am talking about producing, say, a video which can be shown on multiple platforms such as TV and the internet. When I talk about multi-media, I am talking about producing a project of multiple forms of media, such as radio, television, text and so on.

I remember when multi-media really started becoming a buzzword in newsrooms. Back in the early 1990s, the BBC began turning most of its newsrooms into multi-media centers, and its reporters were required to produce their stories for radio and television. It's a good model and, for a freelance one-man-band video journalist, allows you to make additional revenue from your existing work.

But it's not quite as straight forward as you may think, from my experience. I have compiled a couple of tips for successfully converting your existing television stories into radio stories, and doing it quickly. It really is a very fast process, IF you take a few important things into account at the start of the process. You can make life difficult for yourself if you don't:

1) When you are scripting and editing your television story, bare in mind that it will be turned into radio. To avoid a wholesale sound remix when it comes to converting your TV project into radio, make sure you use natural sound in your TV version that will make sense for radio. Think about whether the sound you are using will require explanation for a radio audience that does not have the pictures to help them.

2) Avoid visual references in your script. In television, it is easy to write things like "on the left" or "in the background" and so on. When you are writing your TV piece, think about what will work for radio. Also, avoid things like "here a man hammers a nail". This will work for TV, but for radio you might want to use a sound-up of a hammer and nail, and say something like "A man hammers a nail". The word "here" doesn't really work for radio.

3) In your TV script, use set-up to introduce your soundbites. This is obviously not so easy when you face time constraints. But it will help you significantly when you come to exporting the sound for radio. If you don't introduce your speakers, the radio audience will not know who the speakers are. When you're filming, be sure to gather establishing material for each of your interviewees so you have pictures you can use to introduce them.

4) If you follow the tips above, you should simply be able to export the sound from your TV story and you'll have a radio piece. Once you've cut your television story and exported it from your editing program, go through the sequence and take out the sound that will not make sense for radio. For a radio story, chunks of dry voicetrack is fine. That is better than having natural sound that will confuse the listener. You may want to be more diligent in using fades and tidying up the audio when cutting a radio story. Afterall, the audio is all the audience has, so imperfections in the audio will be much more noticeable than on the television.

When you have fine-tuned the piece, simply export the audio, mixed down to mono with the natsound track and the voicetrack.

5) If you use Final Cut, you will probably export a .wav file. To convert this to other format, I recommend a piece of Mac software called Switch. It can convert from pretty much any audio format to any audio format. Here is a link to that software.

The ability to produce radio is a useful tool in the freelancer's arsenal. Radio is nowhere near as lucrative as television. But if you are producing something for a television client anyway, and want to make some additional money from the same material, you can sometimes make up to $500 from a radio story of a few minutes in duration. If you're a one-man-band, it might just be another instrument worth adding to your one-man orchestra.

Monday
May252009

Making broadcast quality lower 3rds

For the most part when I produce lower 3rds I prefer to use a combination of applications. For the most part I use Photoshop to generate my lower 3rd background graphic bar, and Livetype to create my animated text. If I'm not using animation in my text then I just use the lower 3rd function in Final Cut.

1) Open Photoshop, go to the File menu and select New. From the resulting preset drop down menu, select the video format you are using. If you are using a format that is not listed you can create a custom setting.

2) Create a new layer and select it so your checkerboard layer is now on top. Delete the original plain white background.

3) Select the shape tool from the toolbar (shortcut U). I prefer to use the rounded rectangle. Use the tool to draw the shape of your lower 3rd background graphic and position it where you want it using the move tool.

4) You can fill the bar with color using the foreground color function in the tool bar. If you would like to use an image, animation or video for the bar, open the file in Photoshop. It will appear as a background under the layers tab. Select it and drag it into your checkerboard layer. You can manipulate the size of the image if you wish. Then position it with the move tool so that it covers the lower 3rd bar you drew. Go to layer menu at the top of the screen and select "create clipping mask". You can use your image to fill all or part of the bar.

5) You can now add lots of cool effects to your bar such as bevel and emboss, drop shadows, satin, color overlay, blend an image with the bar color and so on. Play with it until you get the look you want. You can add other shapes within the bar using the shape tool as we did in step 3. You can also add logos to your bar and then change their size to fit, using free transform (ctrl T). In my finished product below you will see that I used the FSN logo and blended it with the lower 3rd bar.

6) We're now ready to add a gradient opacity. Add a layer mask to your bar, make sure black is selected as the background color, white in the foreground, select your gradient tool and draw the gradient you want on your bar from left to right. You can play with this until you have the fade you want.

7) Save your completed bar as a .tif file. Make sure you check the transparency box when you save in order to keep the opacity properties when we come to import into Final Cut. Select 'NONE' for compression.

8) Import into Final Cut and position in the right place as we did in the simple method in the previous post. If you used the correct preset at the start of the process in Photoshop, you should not need to do much positioning.

9) Now we're going to open LiveType to create our animated text. Type the text you need in the box at the top of the screen. You don't need to bother making the text the exact size you need right now, or putting the text in the lower third of the screen.

10) Apply the font, animation, color, size, tracking, texture, glow, shadow that you want and save the resulting file to your hard-drive. I have gone with a fairly basic white font with a small drop shadow.

11) Import the file into Final Cut, bring into the sequence, and use 'Image and Wireframe' to size the text and move it to the right place on the lower 3rd bar. As usual, have the text file that you're manipulating open in the viewer and the finished result in the canvas.

As you can see, the result is fairly professional. There are many other things that you can do using this combination of software. For example, you can add animation to the bar if you have an animated logo you want to incorporate.

This is the method I most often use to achieve results for my lower 3rds. There are, of course, many other ways to create lower 3rds. If anyone has any good recommendations, I'd love to hear about them.

Saturday
May232009

Captioning brought to you by ... a one man band!

There are certainly many good ways to create professional looking lower 3rd graphics for your video. Many news video editors are not responsible for their lower 3rds which are often inserted by the graphics department of the network they work for, such as the graphic seen here from a story I put together for AFP TV. Below, I will create a different lower 3rd for this same picture.


The need for a one-man-band to create lower thirds comes when you're in the game of making finished pieces for clients. Sometimes, the built-in lower 3rd, or text creator in Final Cut can do the trick, but that is very limited in its potential for creating a broadcast quality lower 3rd. Firstly, you generally want more than text - you want a graphic background for your caption too.

In my next post, I will show you how I create my own lower 3rds. It's not necessarily the best way, but it's the way I prefer, and its relatively simple.

But first I want to show you a real easy method I used to use in Final Cut which produces acceptable looking lower 3rds:

1) Find an image or block of color you want to use for your lower 3rd graphic background. Import that image into Final Cut. I prefer to use some sort of texture, or something I have created.

2) Find the place in the timeline you want your lower 3rd to be, and drag the image into the video channel above your current video - the same as using the superimpose function.

3) Position the cursor over the image in the timeline. You'll see the image appear in the center of the canvas, superimposed over the top of your video. Now double click on the image in the timeline to bring it up in the viewer.

4) Select 'Image and Wireframe' and position the graphic in the lower 3rd of the screen, in the place you would like it to go. You may need to manipulate the image at this stage to make it fit. As you postion the image in the viewer, you will see how it looks over the video in the canvas.

5) Once you've positioned your image, which will be the background for your lower 3rd caption, you can add some attributes. In this simple lower 3rd creation method, I usually create some opacity. Select the motion tab in the viewer and check 'opacity'. Pull the slider until you reach the desired level of opacity. (You will notice the opacity is constant. In the second method, I will show you how to create a gradient opacity so your lower 3rd bar gradually fades out.) You can also add a drop shadow.

6) We're now ready to add some text. In this simple example, we are going to use Final Cut's built in lower third text generator. If you want to do more with your lower 3rds, you can install a free FCP plug in by Alex 4D.

For the moment, select lower 3rd in the text menu in the viewer. In 'controls', customize your text and give it the font, color and whatever other attributes you want. Just for fun, I will add a bar from the background menu in the control panel.

7) Drag your text to the video channel above the channel that contains your background image. You are now using 3 video channels. Use 'Image and Wireframe' again to alter the size of your text and position it over the top of your graphic. Make sure the cursor remains over the relevant section of the timeline so you can see the results of what you're doing in the canvas.

8) Once you are happy with the results, render the timeline. Here is the result of the lower 3rd I just created. You will see my image was a kind of blue metal texture. I added some opacity to the image and drop shadows to the text and background bar:


You can add disolves or any other video transitions your wish to your image background or text so that the lower 3rd fades in and out, or wipes in and out, for example. The regular FCP lower 3rd function allows you to create plain color backgrounds, a bar between the lines of text like I inserted, or no background at all. The Alex 4D plugin gives you more flexibility.

In my next post, I will show you how I create more professional looking lower 3rds using a combination of Final Cut, Photoshop and Livetype.

Sunday
May102009

Compression depression

I've had several emails recently from readers who are struggling to find a good method to compress their video files for transmission.

A lot of us multi-skilled VJs are sending our footage back to base from laptops with broadband cards, or plugging into the internet in hotel rooms etc. Sending material over the internet makes a huge amount of financial sense, and it's gotten a lot easier. I used to lug around a Telestream Clipmail where you had to dub material in real time so the box could convert your package into a relatively poor quality MPEG-2 before sending. The good thing about it though was that it would convert from NTSC to PAL on the fly if necessary.

Nowadays, all you need is a piece of free, or at least inexpensive, software to produce pretty high-quality compressed files of a size that can be sent over a broadband connection in a timely manner.

Now, I am absolutely not an expert on this, but I have experimented quite a bit with different pieces of software and compressions. TV stations will clearly want their footage compressed as little as possible to avoid a poor quality picture on a large screen. For the web, you can get a little more creative with your compressions but you still want a good quality picture.

I am very open to suggestions if people think they have a better way of doing things than I'm about to suggest. Many videographers swear by DV, AVI, WMV or DivX files. My suggestions below are based on what I already do for various TV networks. These compressions also work well for web, but you can often get away with much more compression for that medium.

I mostly use MPEG Streamclip. I find it is fast and efficient for compression, and also does a pretty good down'n'dirty standards conversion when you're in a hurry. But there are other pieces of software you can use such as JES Deinterlacer, Visual Hub, MPEG-2 Works, Apple Compressor (Final Cut), Quicktime Player Pro and numerous others.

All my examples below are compressions designed to give the best results in SD. Sending HDV footage via FTP is generally a nightmare, although the H264 compression is probably the way to go there.

My method:

1) The first thing you want to do is SHOOT in HDV regardless of whether you want the final product to be in HDV or SD. As I explained in a previous post, HDV footage down-converted to SD during digitization carries a higher quality than footage shot in DVCAM SD or DV SP (see the next point).

2) There are many ways to convert from HDV to SD footage once you have edited in HDV. But I prefer to down-convert during digitization (edge crop for 4:3, letterbox, or squeeze for anamorphic 16:9). If you down-convert from HDV 16:9 to standard DV wide 16:9, you can create a 4:3 movie later using these MPEG Streamclip export settings: Zoom - 133.3%, X/Y - 1.333.

3) When you have cut your movie, export a completely uncompressed file using the settings with which you edited. In Final Cut, this will be an uncompressed Quicktime Movie (Apple DV/DVCPRO - NTSC or PAL). Compressing during the Final Cut export process is slow, in my experience. It also does not yield the best results. I find compressing in Final Cut often results in picture degradation. Exporting an uncompressed movie means you will not be compressing twice by putting the file through MPEG Streamclip. To export an uncompressed movie from Final Cut, go to Export in the File menu, and select "Quicktime Movie", NOT "as Quicktime Conversion". Use current settings.

4) Take the resulting file and begin the compression process. These are methods I use for different clients.

MP4 FILES:
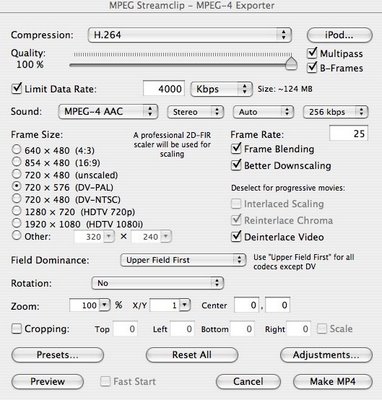
For many of the clients I shoot for, I need to perform an NTSC to PAL conversion, but the compression can be carried out on the same way if there is no standards conversion involved. I usually produce MP4 files. MP4 allows you to create small file sizes but with a superior quality to MP2. I need to make the file of a size that I can quickly transmit using FTP.

I plug the uncompressed file from Final Cut into MPEG Streamclip and use the settings on the left.

If your movie does not contain a lot of movement, you do not need to check the Multipass option. This simply helps with quality when there is action in your shots. For a straight interview or something similar, you can do a single pass.

As you can see, I have used the H264 compression codec for this MP4 file. I have manually set a data rate. Usually, anything over 2000 kbps is fine for a news item. Even if you were sending the piece via satellite, you would get some reduction in quality. For a 90 - 120 second story, I usually go about 4000 kbps. The story in the case about was about 2:30. As you can see, the resulting file size is just 124MB which is good.

Upper field first dominance should be used with H264, and I always deinterlace the video with MPEG Streamclip.

As you can see, I have selected PAL settings (25 fps, 720x576). If you are not converting to PAL, just leave the frame rate box blank, and select DV-NTSC from the list on the left. Frame blending and better downscaling can also be deselected. Frame blending simply helps smooth things over when changing the frame rate.

QUICKTIME FILES:
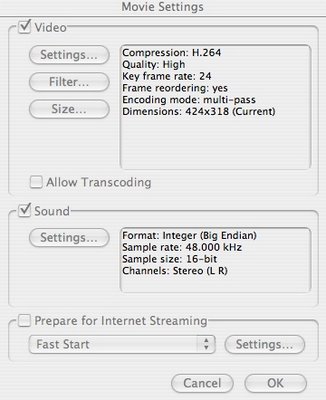
For one particular NTSC client, I actually use Final Cut to export. In the export menu, select "as Quicktime conversion". Use the settings on the right.

Always deselect "Prepare for internet streaming". 424x318 is the default dimensions for exporting in H264. The video will appear in standard DV-NTSC 720x480. When I create PAL MP4 H264 movie files, I usually deinterlace the video. Over time, I have found there can be field problems associated with interlaced video when converting to PAL with the dominance on the upper field first, required for codecs other than DV.

However, in the Quicktime example, I have been asked by the client to keep the video interlaced, and it does not cause these problems, However, it doesn't cause any issues to deinterlace. There is a nice explainer on interlaced vs progressive video here, and why interlacing is bad when resizing video like you would be in an NTSC to PAL conversion.

There are, of course, many satisfactory ways to compress video so it remains broadcast quality but of a size that can be realistically sent over a wireless broadband connection. The smaller the better, especially given that at a lot of events, many journalists are sharing the same wifi connection.

If anyone has any good compression suggestions, or good ideas as to hardware for sending material, please post them up.

Page 1 ... 3 4 5 6 7